Pergolas, Patios, Outdoor Rooms

Springtime can’t be beat in Atlanta. Pergolas, garden sheds, pool houses and screen porches are all valuable additions to your home that capitalize on this most glorious season.  With attention to detail and sensitive material choices, one can create an extension of the home that compliments the space. By picking up and repeating design elements from one structure to the next, a rhythm is developed.  Sometimes outbuildings or sheds serve a purely utilitarian purpose- lawn and garden tools, home for children’s sports equipment, bike storage, or garbage bins. Other times a well placed structure can draw one out into a previous under-utilized yard.

A pergola can be a beautiful addition to a Southen home as our warm climate creates the perfect environment for lush growth to cover the structure. Historically a pergola or arbor, forms a shaded walkway, passageway or sitting area of vertical posts or pillars that usually supprt cross beams and a sturdy open lattice. Often woody vines or flowering climbers adorn the structure. Pergolas can also link pavilions or extend from a building’s door to an open garden feature such as an isolated terrace or pool. They can also provide a peaceful sitting area that allows for breezes and light sun but offers protection from the harsh glare of direct sun. A few well places lighting elements are you are ready for a fantastic cocktail hour under the stars. Give us a call today to start planning a beautiful Spring.

Renovating for the Family

When homeowners open their houses to us to renovate we often get a close glimpse into the things that are important to them. We are currently working on a project in Chastian Park with a special story and design request.  The homeowner’s mother had lovingly painted a mural in their young daughter’s room and then unfortunately passed away after its completion. When planning their second floor addition and relocation of their daughter’s room, the clients asked our architect Donna Southwick if there was any way to save and move this family treasure. Donna took up the challenge and designed the new space to work with the old mural and our crews managed to carefully remove the wall and relocate it to the second floor. It took planning, time, and a crew that valued the mural that was important to this family. Here’s Donna in front of the mural in its new location. Now it will be covered and protected until the conclusion of the project when the homeowners will have a new second floor space for their family to grow while keeping a treasured heirloom.

Smaller Renovations

This may seem like an unusual idea from a firm that renovates and often enlarges homes. But at Home ReBuilders, we have always tried to design the best spaces for our clients as they develop a home for their “best living”.

As we start the New Year, we often ask ourselves what is ahead for the future. Our industry has seen so many changes over the last five years and we have seen these changes affect the way people view their homes. Today the focus is less on square footage and more on smart design. We are examining efficiencies in everything from architectural design, the building products we use, and the office methods we practice, all in an effort to provide the best value to homeowners as they develop their homes.

The days of cavernous projects with bloated square footage are over. Today each room or space in a home is asked to do double duty.  A family room may be a space for watching a movie as well as a place to pull out a laptop and get some work done.  Meals are cooked in the kitchen while bills are paid and homework is tackled. Storage is always a concern for today’s client and we focus on built-in cabinetry, bookshelves, and efficient closet space.

Atlanta’s home market is picking up. Houses have been selling, home values have been rising and there seems to be a general breath taking. It is safe again. It is time to make your home the place you would like it to be by building smarter. Today we want each and every inch put into a project to make sense and feel like home. Give us a call if you would like to explore some options for your home in the New Year.


Screen Porches

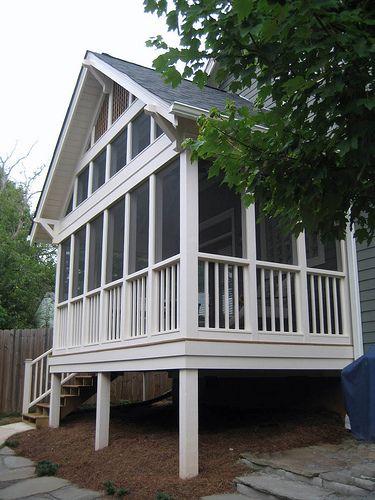
Spring may seem like a long way off but in Atlanta the temperatures tend to rise overnight. Soon we’ll be in the thick of one of the South’s loveliest seasons. No one does springtime quite like Atlanta and a screened porch can be just the place to enjoy it. Of all the many projects we do at Home ReBuilders, screened porches are one of our favorites. Atlanta’s mild climate (and plentiful bugs), make a screened porch a valuable addition to any home. Some porches can be extensions of the front entry making a welcoming spot to watch the neighborhood and greet friends. Other porches provide a location to catch a football game on a flat screen TV or enjoy the warmth of an outdoor fireplace. If you are thinking about adding a porch onto your home, now is the time to start the process to get you into that space for spring. Our design phase begins with a site visit to measure your existing home, document all current materials, observe the style of your home and neighborhood character. We talk to you about how you hope to use the space, what type of furniture and seating you may want to use and how you envision the exterior to look. Some factors to consider when thinking about a porch addition concern the current style of your home. Is your roof pitch in the style of a peaked Tudor home? Are Craftsman elements existing on your exterior facade? When adding an exterior element to your home, consider the style and how to capitalize and improve on it. At Home ReBuilders we think a lot about these details. Exposed rafters, bead board ceilings, timber framing, and custom brackets are all details we can employ to create a thoughtful addition to your home. The list of material choices and selections can be infinite in deck repair and construction, from salvaged brick flooring installed in a herringbone pattern, painted wood deck flooring, or fieldstone on to the type of screen material to be used. After the design phase, we can move through to obtaining the proper permits and then start breaking ground. A good timeline to keep in mind is 3-6 weeks to get a project through the design phase and Atlanta permitting typically runs about 4 weeks. So in about a two months, ground can be broken for that new screened porch!

Design Trends for 2014

It’s a new year and everyone seems to be talking about what is ahead. Here are some design trends to watch for in 2014.

Brass
After having been one of the top items on homeowners lists to remove or change for years, brass is making its way back into the home again. We saw this one coming and wrote about it in a previous post. What makes this trend fun and interesting in our field of renovation is seeing brass or warmer metals as accents. A faucet here, a light fixture there is the name of the game. It’s all about the mix of metals and finishes, not so much about the complete matching suites we have seen for years. So if you have been plagued with 80’s brass knobs, you may want to look at them with new eyes and a bit more love.

Color Palettes
Color in homes is always a trendy and fickle topic. The design world seems to be featuring interiors in a few camps. Dark, mysterious dining rooms and libraries painted in rich greens, inky blues, or deep slates and eggplants. Woodwork is painted these saturated colors and the finish is glossy. At the other end of the spectrum is the frequently seen all white palette. Airy and ethereal, these rooms provide a soft background for mixed fabric textures and wood finishes.

Knotty Woods
For years, high end wood grains have ruled the day. Walnut, maple, and  cherry have been the wood species of choice with looking at cabinetry or stained paneling. In the future we will be seeing more rustic woods applied in sleeker modern spaces. Wood always provides a warmth that many modern spaces need as a counterpoint to their sharp edges and clean lines. Think about Belgian pickled oaks and cypresses. Rustic, live edge shelving applied to a clean, tiled backsplash is a trend to watch.

Serenity
People are still looking for relaxation and serene master suites and baths are the hot item. Soothing colors, soft textures, and natural materials are the choice when creating s space to forget about the work day or stresses of everyday life. Spa culture has seeped into the design world and we are frequently asked to help transform a master bath or suite into one’s favorite spa. A few clean lines, soft lighting, organized towel storage and a touch of teak can get you there.

Versatility
Homeowners today are ready to transform their homes after several years of waiting but value is still a focus. We strive to create the best spaces to use today and well into tomorrow. This need for versatility is a trend we see in our design department when working with clients as well as the interior design world. Furniture and spaces need to offer several functions. The family room may be a spot to watch a family movie or relax but it also needs to provide ample storage and a place to pull out a laptop and she dome emails. Kitchens need to be a place to cook meals, organize bill paying and paperwork, serve as mudrooms and homework stations. Everything needs to earn it’s place in the home. Superfluous square footage and empty rooms are out. Smart design, multi purpose space and furniture is in.

Radiant Floor Heating

Radiant heating for flooring has moved from an over-the-top luxury item to something that is now frequently installed and  has enegry efficiency advocates smiling. Not much can beat the feel of a heated floor. Just an even blanket of heat, right where you want it.

That’s the appeal of radiant floor heating, says This Old House plumbing and heating expert Richard Trethewey, who has long been a fan. “It’s truly invisible,” he says. But a radiant floor system has more than just aesthetics going for it. It’s also a highly efficient way to heat a house, increasing comfort as it reduces energy costs.

In a radiant setup, the warmth is supplied by hot-water tubes or electric wires buried underneath the floor. As the invisible waves of thermal radiation rise from below, they warm up any objects they strike, which radiate that captured heat in turn. Though the air temperature remains relatively constant, you stay comfortable because the surrounding surfaces aren’t stealing warmth from your body.

Contrast that with what happens in a conventional forced-air heating system, the kind found in most American homes. Air blows out of the registers at a well-baked 120 degrees, rises to the top of the room where it quickly sheds heat, then drops back down as it cools. The air in the room becomes uncomfortably stratified: Your head can be bathed in warmth while your toes lie in the frozen zone. Then there’s the problem of cycling. “You turn on the furnace, it quickly takes you to 68 or 70, and then shuts off,” says Richard. The result is a phenomenon he calls “the cold 70,” which is what you feel right after the hot air stops pumping from the registers. Those jarring ups and downs are absent with radiant floors, which may reach 85 degrees, tops, on a frigid day. The warm air still rises, but it does so evenly over the entire floor, so the coolest air stays up at the ceiling. “You’re heating where the people are,” Richard says.

There are two basic ways to supply this gentle, even warmth: hot water or electricity. Electric radiant, which uses zigzagging loops of resistance wire, is ­generally retrofitted to a single room, such as a bathroom or kitchen. Hot-water “hydronic” systems—the most popular and cost effective way to heat an entire house—circulate water from a boiler or water heater through loops of 1/2-inch polyethylene tubing. The flexible tubes can be installed in a variety of ways: on top of the subfloor in grooved panels or snap-in grids; clipped ­into aluminum strips on the underside of the floor; or embedded in poured concrete. Once the system is in place, you can cover it with most types of finish flooring, including hardwood and tile. Carpet, however, can be tricky, especially if it has thick padding underneath. “If the floor is too well insulated, radiant heating really ­doesn’t make sense,” Richard says. “It’s like putting a sweater over a radiator.”

Hot-water radiant costs more to install than other types of heating systems—from $6 to $15 per square foot depending on the method, whether you’re starting from scratch or retrofitting, and where you live. New builds where the tubes are buried in concrete slab tend to be the least expensive. And you’ll still need a separate air-conditioning system for cooling. But if the price tag puts you off, consider this: Once it’s up and running, a radiant system can be up to 30 percent more efficient than forced-air heating, depending on how well insulated a house is. And there’s no comparison when it comes to comfort. In that category, radiant always wins, feet down.

Roof Dormers, an Added Style Element

At Home ReBuilders, we find most clients come to us with a universal goal. They almost always are looking for more space. Sometimes the space needs to be improved on, updated, or modified but most commonly it is all of those things plus “more”. We have seen construction budgets tighten in the past few years and homeowners are considerate of not overbuilding and maintaining value in their home but their goals tend to be the same. They are looking to maximize all of the square footage in their home. They want a new playroom or extra bedroom for family. They would like a master suite with room for a large closet and sitting ares. They are looking for a media room or family room to stretch out in. Adding dormers to a renovation can be a clever way to grant these wishes without adding the expense of a full storey addition.

Simply put, dormers are windows with their own roof that jut out from the larger roof. Dormers are built in a variety of shapes, including flat, shed, gabled, pedimented, hipped,  arched, oval, eyebrow, inset and composite. Because they can be inserted into an existing roof line, they often can provide the head height needed to turn an attic or awkward space into useable real estate.

Eyebrow dormers are characterized by a low upward curve and a lack of vertical sides. It looks much like a sleepy, or half-opened, eye. The eyebrow dormer is often a feature of Shingle style architecture.

Typical in the English Tudor style, gabled dormers have gabled roofs, with two sloping planes that meet in the center.

The hipped dormer has a hipped roof, which is characterized by three sloping planes that meet at the top. Prairie Style and Craftsman architectural styles are the types that typically feature hipped dormers.

Also called recessed dormers, inset dormers, unlike other dormers, are set back into the roof, which gives them a distinctive architectural style.

The simplest form of dormer, shed dormers have a roof with a single sloping plane. This style is found in Arts & Crafts and Colonial Revival architecture.

A shed dormer is a popular addition because it extends living space with height and width. A shed dormer’s eave line is parallel to the eave line of the roof.

A dormer, regardless of style, can add an extra element of charm to any exterior. Start looking around your neighborhood, dormers are everywhere!

Home Storage Tips

When you first move into your new or renovated home, you wonder how you are going to fill up the large, empty space. Pretty soon life takes over — and before you know it, you are wondering where all of that space went.

If you find yourself struggling to find room to store everything you’ve accumulated over the years, see if these storage options might work for you.

Before you invest a lot of time deciding where things should go, look through your closet, files and drawers to determine what can be thrown or given away. For clothes, it is a good rule of thumb to get rid of items that you have not worn in more than 12 months.

A lot of your household financial documents and papers may be available online through the provider company’s website. If that is the case, discard old financial statements or bills that you can more easily access electronically. Invest in a paper shredder for these documents to protect your identity and accounts.

It is very easy to allow cabinets and drawers to become cluttered over time, especially when you have to do a quick cleaning of your home when you have surprise visitors. Declutter those drawers periodically to keep from accumulating outdated flyers, menus, magazines and newspapers. This will open them up so you can store more day-to-day items that you need to quickly reach.

If you are looking to replace old, worn-out furniture in your home, buy pieces that also can serve as storage. Consider a coffee table that has drawers or an ottoman that can open up and double as a spot to store your blankets.

In closets and in the kitchen,use all of the space that is available to you. Often home owners are giving up valuable square footage if they don’t install cabinets or shelves that go up to the ceiling.  Store items that are either out of season or that are rarely accessed — such as holiday decorations — on the higher shelves where they are out of the way. This will free up the lower shelves to allow you to get to the things that you use on a regular basis.

Bed risers can be found in home design and improvement stores in different shapes, styles, textures and colors to complement your current bedroom furniture. They are inexpensive and not only give you added storage space, but will also give your bedroom a new look. By simply raising the height of your bed a few more inches, you can gain a lot more storage space that is also hidden away.

Kitchen Design

One of the most important things to consider in your upcoming kitchen renovation is working with an experienced designer who is well versed in the standards set by the National Kitchen & Bath Association (NKBA) Below is an outline of some of their recommended measurements and dimensions for effective kitchen design. Enjoy!

The National Kitchen & Bath Association (NKBA) recommends the following guidelines for kitchen planning.

The NKBA developed the kitchen planning guidelines to provide designers with good planning practices that consider users’ typical needs. A committee of experts in kitchen design reviewed lifestyle and design trends and model building code requirements to ensure the guidelines promote the health, safety, and welfare of consumers. Existing relevant research and new research on storage provide the basis for these updated guidelines.

Kitchen Planning Guideline 1- Door Entry
Recommended: The clear opening of a doorway should be at least 34 inches wide. This would require a minimum 2-foot 10-inch door.

Kitchen Planning Guideline 2: Door Interference
Recommended: No entry door should interfere with the safe operation ofappliances, nor should appliance doors interfere with one another.

Kitchen Planning Guideline 3: Distance Between Work Centers
Recommended: In a kitchen with three work centers*, the sum of the three traveled distances should equal no more than 26 feet with no single leg of the triangle measuring less than 4 feet nor more than 9 feet.

When the kitchen plan includes more than three primary appliance/work centers, each additional travel distance to another appliance/work center should measure no less than 4 feet and no more than 9 feet.

Each leg is measured from the center-front of the appliance/sink.

No work triangle leg intersects an island/peninsula or other obstacle by more than 12 inches.

*A major appliance and its surrounding landing/work area form a work center. The distances between the three primary work centers (cooking surface, cleanup/prep primary sink, and refrigeration storage) form a work triangle.

Kitchen Planning Guideline 4: Separating Work Centers
Recommended: A full-height, full-depth, tall obstacle* should not separate two primary work centers.

A properly recessed tall corner unit will not interrupt the workflow and is acceptable.

*Examples of a full-height obstacle are a tall oven cabinet, tall pantry cabinet, or refrigerator.

Kitchen Planning Guideline 5 – Work Triangle Traffic
Recommended: No major traffic patterns should cross through the basic work triangle.

Kitchen Planning Guideline 6: Work Aisle
Recommended: The width of a work aisle should be at least 42 inches for one cook and at least 48 inches for multiple cooks. Measure between the counter frontage, tall cabinets, and/or appliances.

Kitchen Planning Guideline 7: Walkway
Recommended: The width of a walkway should be at least 36 inches.

Kitchen Planning Guideline 8: Traffic Clearance at Seating
Recommended: In a seating area where no traffic passes behind a seated diner, allow 32 inches of clearance from the counter/table edge to any wall or other obstruction behind the seating area.

  • If traffic passes behind the seated diner, allow at least 36 inches to edge past.
  • If traffic passes behind the seated diner, allow at least 44 inches to walk past.

Kitchen Planning Guideline 9: Seating Clearance
Recommended: Kitchen seating areas should incorporate at least the following clearances:

  • 30 inches for high tables/counters with a 24-inch-wide by 18-inch-deep counter space for each seated diner.
  • 36-inch-high counters with a 24-inch-wide by 15-inch-deep counter space for each seated diner and at least 15 inches of clear knee space.
  • 42-inch-high counters with a 24-inch-wide by 12-inch-deep counter space for each seated diner and 12 inches of clear knee space.

Kitchen Planning Guideline 10: Cleanup/Prep Sink Placement
Recommended: If a kitchen has only one sink, locate it adjacent to or across from the cooking surface and refrigerator.

Kitchen Planning Guideline 11: Cleanup/Prep Sink Landing Area
Recommended: Include at least a 24-inch-wide landing area* to one side of the sink and at least an 18-inch-wide landing area on the other side.

If all of the countertop at the sink is not at the same height, then plan a 24-inch landing area on one side of the sink and 3 inches of countertop frontage on the other side, both at the same height as the sink.

The 24 inches of recommended landing area can be met by 3 inches of countertop frontage from the edge of the sink to the inside corner of the countertop if more than 21 inches of countertop frontage is available on the return.

*Landing area is measured as countertop frontage adjacent to a sink and/or an appliance. The countertop must be at least 16 inches deep and must be 28 inches to 45 inches above the finished floor to qualify.

Kitchen Planning Guideline 12: Preparation/Work Area
Recommended: Include a section of continuous countertop at least 36 inches wide by 24 inches deep immediately next to a sink for a primary preparation/work area.

Kitchen Planning Guideline 13: Dishwasher Placement
Recommended: Locate nearest edge of the primary dishwasher within 36 inches of the nearest edge of a cleanup/prep sink.

Provide at least 21 inches* of standing space between the edge of the dishwasher and countertop frontage, appliances, and/or cabinets, which are placed at a right angle to the dishwasher.

*In a diagonal installation, the 21 inches is measured from the center of the sink to the edge of the dishwasher door in an open position.

Kitchen Planning Guideline 14: Waste Receptacles
Recommended: Include at least two waste receptacles. Locate one near each of the cleanup/prep sink(s) and a second for recycling either in the kitchen or nearby.

Kitchen Planning Guideline 15: Auxiliary Sink
Recommended: At least 3 inches of countertop frontage should be provided on one side of the auxiliary sink and 18 inches of countertop frontage on the other side, both at the same height as the sink.

Kitchen Planning Guideline 16: Refrigerator Landing Area
Recommended: Include at least:

  • 15 inches of landing area on the handle side of the refrigerator, or
  • 15 inches of landing area on either side of a side-by-side refrigerator, or
  • 15 inches of landing area that is no more than 48 inches across from the front of the refrigerator, or
  • 15 inches of landing area above or adjacent to any undercounter-style refrigeration appliance.

Kitchen Planning Guideline 17: Cooking Surface Landing Area
Recommended: Include a minimum of 12 inches of landing area on one side of a cooking surface and 15 inches on the other side.

For safety reasons, in an island or peninsula situation, the countertop should also extend a minimum of 9 inches behind the cooking surface if the counter height is the same as the surface-cooking appliance.

For an enclosed configuration, a reduction of clearances shall be in accordance with the appliance manufacturer’s instructions or per local codes. (This may not provide adequate landing area.)

Kitchen Planning Guideline 18: Cooking Surface Clearance
Recommended: Allow 24 inches of clearance between the cooking surface and a protected noncombustible surface above it.

Code Requirement:

  • At least 30 inches of clearance is required between the cooking surface and an unprotected/combustible surface above it.
  • If a microwave hood combination is used above the cooking surface, then the manufacturer’s specifications should be followed.

Refer to manufacturers’ specifications or local building codes for other considerations.

Kitchen Planning Guideline 19: Cooking Surface Ventilation
Recommended: Provide a correctly sized, ducted ventilation system for all cooking surface appliances. The recommended minimum is 150 CFM.

Code Requirement:

  • Manufacturers’ specifications must be followed.
  • The minimum required exhaust rate for a ducted hood is 100 CFM, and it must be ducted to the outside.
  • Make-up air, fresh air brought inside to replace exhausted air, may need to be provided. Refer to local codes.

Kitchen Planning Guideline 20: Cooking Surface Safety
Recommended:

  • Do not locate the cooking surface under an operable window.
  • Window treatments above the cooking surface should not use flammable materials.
  • A fire extinguisher should be located near the exit of the kitchen away from cooking equipment.

Kitchen Planning Guideline 21: Microwave Oven Placement
Recommended: Locate the microwave oven after considering the user’s height and abilities. The ideal location for the bottom of the microwave is 3 inches below the principle user’s shoulder, but no more than 54 inches above the floor.

If the microwave oven is placed below the countertop, the oven bottom must be at least 15 inches off the finished floor.

Kitchen Planning Guideline 22 – Microwave Landing Area
Recommended: Provide at least a 15-inch landing area above, below, or adjacent to the handle side of a microwave oven.

Kitchen Planning Guideline 23: Oven Landing Area
Recommended: Include at least a 15-inch landing area next to or above the oven.

At least a 15-inch landing area that is not more than 48 inches across from the oven is acceptable if the appliance does not open into a walkway.

Kitchen Planning Guideline 24: Combining Landing Areas
Recommended: If two landing areas are adjacent to one another, determine a new minimum for the two adjoining spaces by taking the longer of the two landing area requirements and adding 12 inches.

Kitchen Planning Guideline 25: Countertop Space
Recommended: A total of 158 inches of countertop frontage, 24 inches deep, with at least 15 inches of clearance above, is needed to accommodate all uses, including landing area, preparation/work area, and storage.

Built-in appliance garages extending to the countertop can be counted towards the total countertop frontage recommendation, but they may interfere with the landing areas.

Kitchen Planning Guideline 26: Countertop Edges
Recommendation: Specify clipped or round corners rather than sharp edges on all counters.

The Internet and Home Design

Home ReBuilders has been in business for over 30 years. One can imagine how taste and style has changed since the mid-eighties. In the early days, homeowners were interest in a new bathroom or some more space for their family. Design decisions seemed to focus on brass and crystal doorknobs, stepped coffered ceilings, floral wallpaper, and pressure treated angled decks. People also had a vague or hazy vision of what they would like to see their home look like, often shaped by what they may have seen in a friend’s home. People would talk, Bill and the designers would talk, and we produced a lot of great projects for happy clients.

Shelter magazines, things that had been around for years, seemed to be everywhere in the late-nineties. The market for remodeling and home improvement was hot and publications took notice. Grocery check out lines started populating their shelves with home magazine focusing on renovation. As designers, this was a help. We could suggest clients start really looking at what appealed to them and their focus became more detailed. Homeowners would come to meetings with clippings and tear sheets of things they liked and products they could envision in their space.

Today, Pinterest and Houzz and a multitude of blogs are shaping the industry and people’s tastes. The days of a person coming to a kitchen design meeting with a folder overflowing with ripped magazine pages seems to be over. A laptop or Ipad is pulled out today and a digital file is opened. Again, the result is the same. Clients are educated and opinionated. It’s our job to bring these digital fantasies about what their home can be to life. Successful design starts with communication and these internet sites can be a launch pad for discussion. Be sure to explore them if you are looking for ideas for your next renovation.